
Tuesday, May 12, 2020
Monday, March 2, 2015
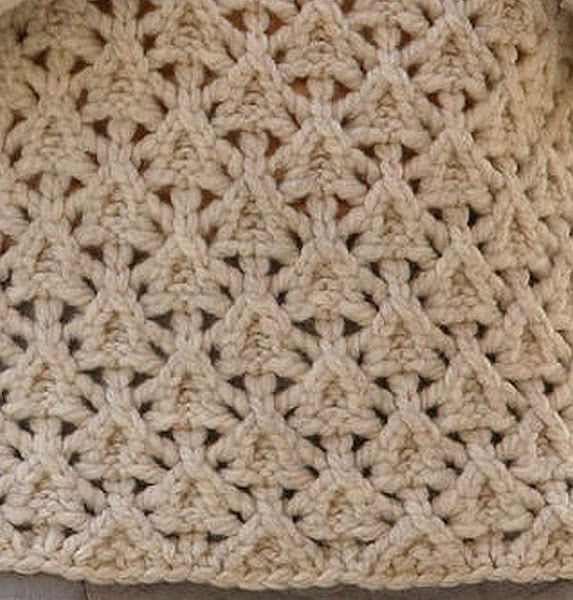
Tangerine slice knit stitch from a Portugese site from Brazil
I found a Portugese photo by photo instruction for this "tangerine slice" circular shell knit stitch.
I will give you the link to the Portugese language page. The instructions are ABOVE the picture that illustrates the row.
1. Go to the link
2. Read my translations for each step.
There is a request from the author not to copy the photos of the blog so you must open her blog and read my notes for each photo.
*slip 1 knitwise, K2, 1YO, P 10, 1YO, K 2, 1 YO P 10, 1 YO *end up with P3.
Purl entire row.
*slip 1 knitwise, K 2, K 12 with 3 wraps (YOs) between each stitch…to make the three wraps see the photo below wrap from the back to the front because if you wrap the other way they will come undone…Knit *…ending up with K 2 and P 1.
Three wraps around the needle.
Going to look like this with enough stitches on the needle.
Now is the tricky step: Pick the stitch knitwise and let drop the wraps as if they were part of this stitch off the left needle.
Pass the remaining elongated stitch to the right needle. Repeat
Now knit these two elongated stitches together.
Here are the two k tog with the edge slip stitch.
You can see the 12 stitches decreased to 6 elongated stitches.
The entire row has been finished in pattern.
The wrong (reverse) side looks like this.
Here you can see the shells forming.
At the end, the person who illustrated this stitch says:
I hope that I was able to teach you how to make this beautiful stitch. Whatever I know, so I make.
Also refer to this link which has lovely photos but no step by step instructions to see how it looks with light weight yarn.
http://muitasartes.com.br/2011/08/receita-cachecol-de-trico-com-ponto-mexerica/
I will give you the link to the Portugese language page. The instructions are ABOVE the picture that illustrates the row.
1. Go to the link
2. Read my translations for each step.
There is a request from the author not to copy the photos of the blog so you must open her blog and read my notes for each photo.
http://muitasartes.com.br/2011/08/pap-ponto-mexerica-em-trico/
Above photo 1.
There are two rows of preparation. Knit one row and purl one row.
Above photo 2.
First row of pattern:Slip one stitch knitwise, K 2, 1YO, P6,1YO, K2, 1YO, P6,1YO, ending up with k2 and P 1.
Above photo3 second row of pattern
Slip one stitch knitwise, P2, 1YO, K 8, 1YO, P2, 1 YO, K 8, 1 YO, ending up with P 3.
Above photo 4 third row of pattern:
*slip 1 knitwise, K2, 1YO, P 10, 1YO, K 2, 1 YO P 10, 1 YO *end up with P3.
Above photo 5 fourth row of pattern:
Purl entire row.
Above photo 6 fifth row of pattern:
*slip 1 knitwise, K 2, K 12 with 3 wraps (YOs) between each stitch…to make the three wraps see the photo below wrap from the back to the front because if you wrap the other way they will come undone…Knit *…ending up with K 2 and P 1.
Photo 7 shows the back to front direction of wraps .
Above Photo 8
Three wraps around the needle.
Above Photo 9
Going to look like this with enough stitches on the needle.
Above photo 10
Now is the tricky step: Pick the stitch knitwise and let drop the wraps as if they were part of this stitch off the left needle.
Above Photo 11
Pass the remaining elongated stitch to the right needle. Repeat
Above Photo 12
Now knit these two elongated stitches together.
Above photo13
Here are the two k tog with the edge slip stitch.
Above photo 14
You can see the 12 stitches decreased to 6 elongated stitches.
Above photo 15
The entire row has been finished in pattern.
Above photo 16
The wrong (reverse) side looks like this.
Above photo 17
Here you can see the shells forming.
At the end, the person who illustrated this stitch says:
I hope that I was able to teach you how to make this beautiful stitch. Whatever I know, so I make.
Also refer to this link which has lovely photos but no step by step instructions to see how it looks with light weight yarn.
http://muitasartes.com.br/2011/08/receita-cachecol-de-trico-com-ponto-mexerica/
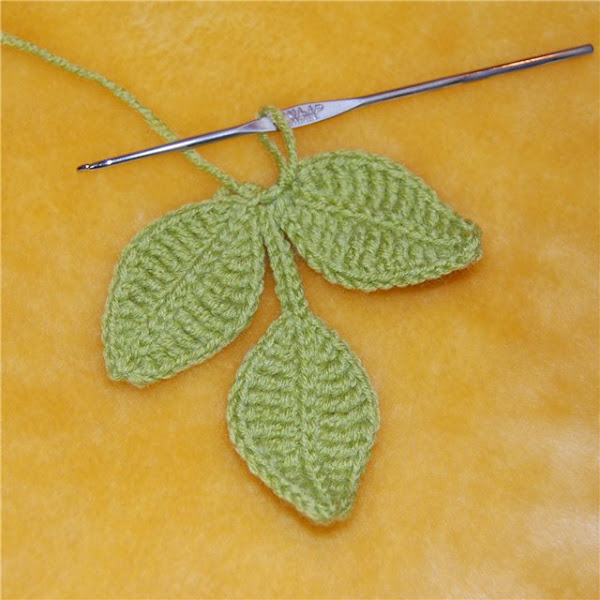
Simple leaf pattern from Russian crochet site
This comes from a Russian site via Yandex which translates it to absolute gibberish.
These leaves are used to decorate a child's hat.
http://www.liveinternet.ru/users/4163063/post276192485/
I translated this for someone on a forum but things get buried in forums so I am making this copy available here on my blog.
The day I posted this, the questioner found a video in Russian for making this on you tube.
I corrected my writeup based on just looking at the pictures below.
Here is the link to the You Tube video of leaves
Chain 15. Make a SC in the second chain from hook.


These leaves are used to decorate a child's hat.
http://www.liveinternet.ru/users/4163063/post276192485/
I translated this for someone on a forum but things get buried in forums so I am making this copy available here on my blog.
The day I posted this, the questioner found a video in Russian for making this on you tube.
I corrected my writeup based on just looking at the pictures below.
Here is the link to the You Tube video of leaves
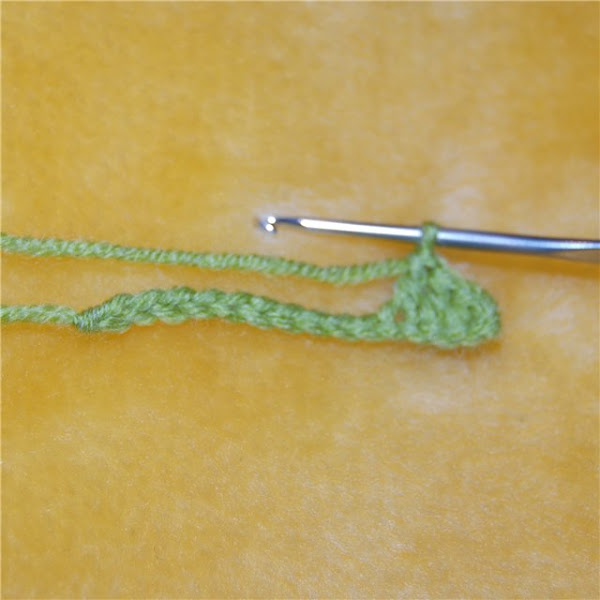
LEAVES
Chain 15. Make a SC in the second chain from hook.
Working in the front loops of each chain make:
1 hdc,1 dc, 2 trebles, 3 double trebles, 2 trebles, 1 dc, 1hdc, 1 sc
This makes a 13 stitch rounded half leaf. You are at the end of the chain.
Slip stitch to the beginning chain and slip stitch to the other side of the chain.
1 hdc,1 dc, 2 trebles, 3 double trebles, 2 trebles, 1 dc, 1hdc, 1 sc
This makes a 13 stitch rounded half leaf. You are at the end of the chain.
Slip stitch to the beginning chain and slip stitch to the other side of the chain.
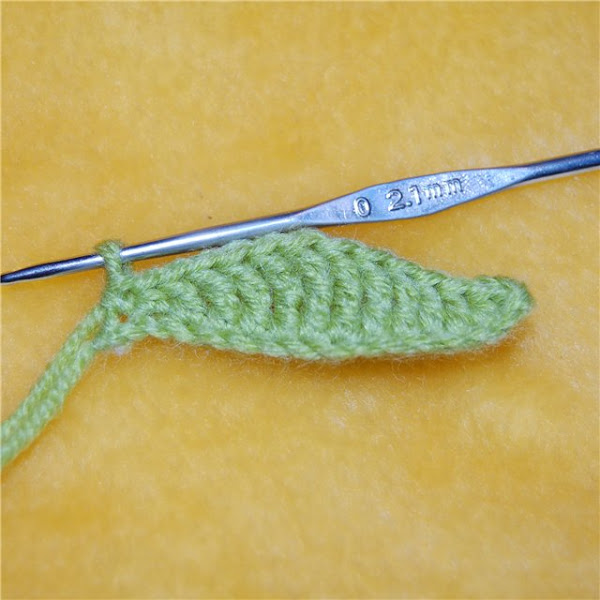
Turn the leaf over so the unused loops shown at the bottom of the picture above are to your left.
Now working in the back loops ( you used up the front loops for the first half of the leaf) make the same series of stitches as the first side.
Now working in the back loops ( you used up the front loops for the first half of the leaf) make the same series of stitches as the first side.
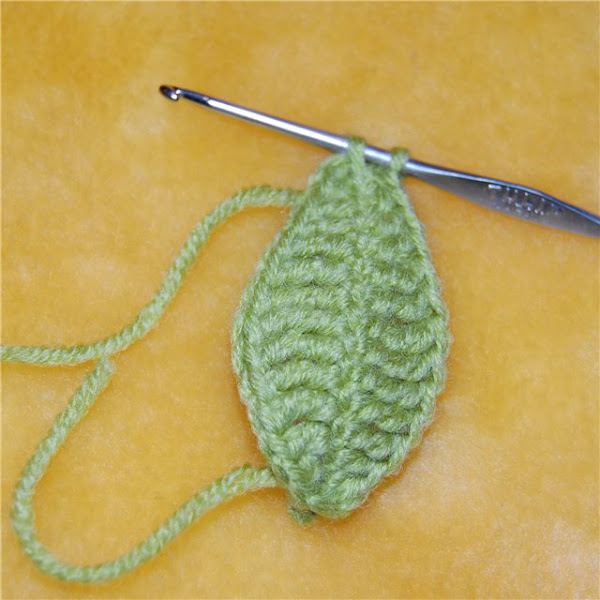
Pull the yarn through the last loop and tie it off. Cut the yarn leaving an 8 inch tail. Bury this tail into the center stitches on the back of the leaf, now or when you finish all three leaves.
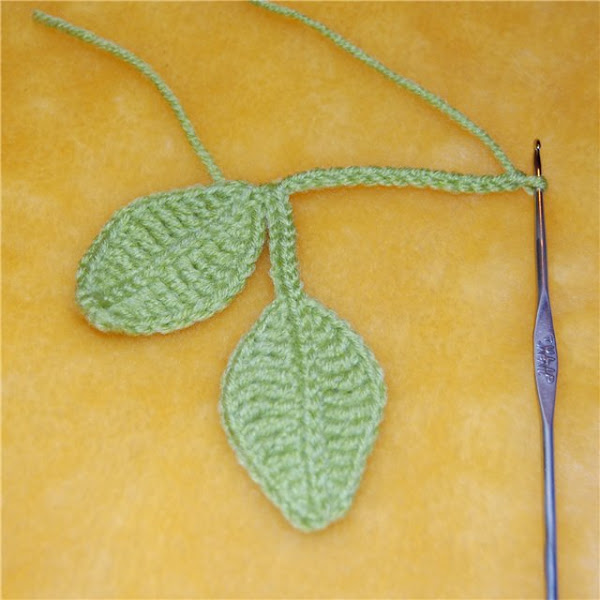
Attach the yarn to the top of the leaf (away from where the cut tail is).
Attach the yarn to the top of the leaf (away from where the cut tail is).
Now chain 25 stitches. 10 of them are your stem between leaves.
Make another leaf on the 15 chains just like the first leaf. See picture below.
Chain
another 15 stitches from the base of leaf 2. Make your third leaf so
the second and third leaves are joined at the base to the same 10th
chain off the first leaf.
Now
working in the back loops ( you used up the front loops for the first
half of the leaf) make the same series of stitches as the first side.
Tie off the thread and bury the tail. If you would like to keep going and make more leaves on a longer sprig, keep repeating these steps until you have the number of leaves you want.
Saturday, August 9, 2014
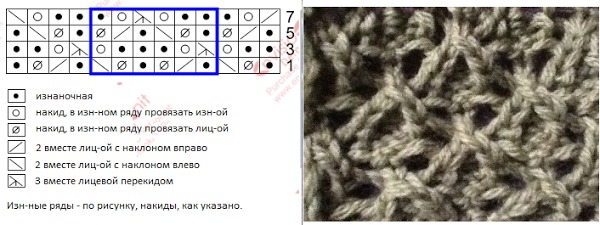
Russian Knitting Pattern with interlaced triangles
Delicate patterns spokes
A small selection of openwork patterns spokes, everywhere from the network.1. An interesting pattern: Agur and crossing? (Agur means openwork ajouree in French)
August 10, 2014
To all Knitting Paradise followers of this pattern: Good news. Here is the stitch list for this pattern. Please refer to the photo and chart at the top of this page.This translation is courtesy of a Russian friend and is error and guess free. Thanks Julie!
Chart clarification:
The even rows 2,4,6,etc are not shown. These wrong side rows
are all purl except for the Ø yarn overs on the right side.
1. Black dot is purl.
2. O Open circle is YO on the right side. You purl this on the
wrong side along with all stitches of the wrong side.
3. Ø is a yarn over on the right side. Why is it different??? On the wrong side where you purl the entire
row, you Knit the Ø. You may consider marking these yarn overs so you can distinguish them on the wrong side from other yarn overs.
4. / is a knit two together with the slant to the right (A
right leaning decrease)
http://youtu.be/nG0EwVuFS1w
http://youtu.be/nG0EwVuFS1w
The last symbol is a left leaning double decrease. S1, k2 tog, psso. See the YouTube video on how to knit this.
http://youtu.be/HqFHeKaFNXE
http://youtu.be/HqFHeKaFNXE
I have reached the end of deciphering this chart.
One additional note on charts. You see the blue square in the chart. This is your design repeat.
The other stitches on the sides are the beginning and ending stitches. You have to make as many repeats as you have to fit the sweater to your size. But make sure the beginning and the ending of the repeats is just like the chart shows. Do not end up with a series of design repeats and then stop.
Happy knitting to all.
Subscribe to:
Posts (Atom)